Fall Foodie: Sea Salt Pumpkin Butter Cups

Good Morning and Happy Wednesday, everyone!

While today would typically be my half-day/work-from-home day at my office- the schedules have rotated for the Fall/Winter and that day has now been delegated to Thursdays. My “Hump Days” will be spent commuting to and working from my office- but that doesn’t mean my posting schedule has to change!

On the contrary- I thought I’d use the mid-work-week mark as an opportunity to share another Autumn-inspired recipe- and a Halloween appropriate one if you’re up to making a bunch of these to either hand out to trick-or-treaters or bring to your next spooky gathering!

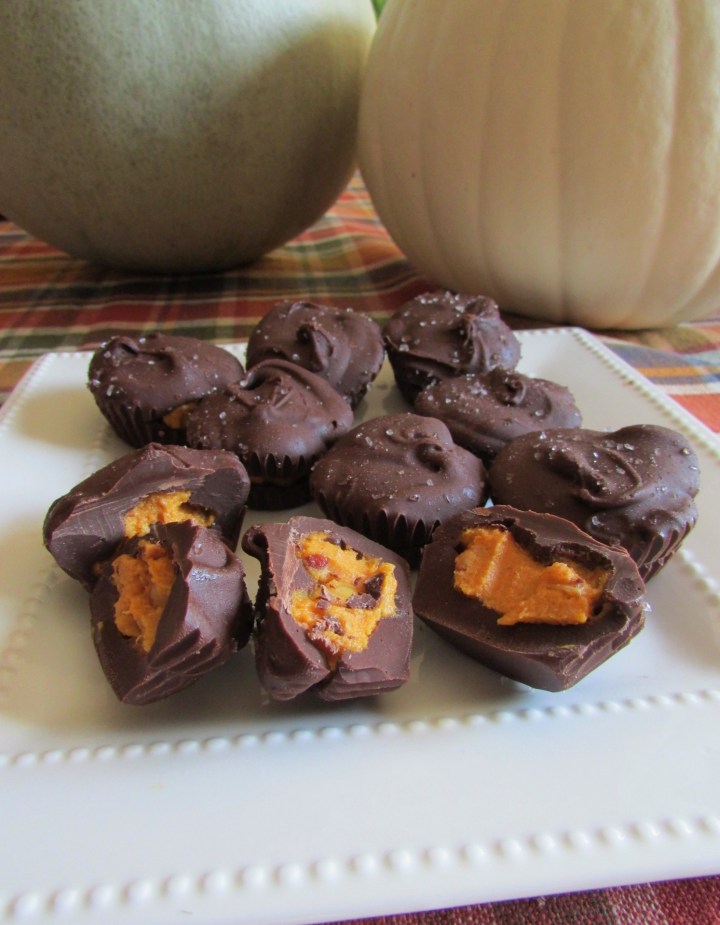
These salted pumpkin & peanut butter cups are the ideal candy- a savory mix of sweet and salty, smooth and crunchy. The true trick is eating one and being able to stop yourself from having another (or four.)

Best of all? There’s no baking required!

WHAT YOU’LL NEED:

  • 2 cups dark chocolate chunks/baking morsels
  • ⅓ cup crunchy peanut butter (you can use almond butter, too!)
  • 3 tablespoons pumpkin puree
  • ½ teaspoon pumpkin pie spice
  • 1 teaspoon honey
  • Coarse sea salt, for finishing

READY? HERE’S WHAT YOU DO:

  1. Melt dark chocolate (with a stove top or microwave.) Stir with a spoon or spatula until the melted chocolate is smooth.
  2. Line a series of mini cupcake papers on a baking sheet.
  3. In a bowl, combine the ⅓ cup of peanut butter, pumpkin puree, pumpkin pie spice, and honey.
  4. Place ½ tablespoon of chocolate into the bottom of each of the cupcake papers.
  5. Drop in 1 teaspoon of peanut butter/pumpkin mixture onto the top of the melted chocolate within the cupcake papers. Cover with remaining melted chocolate.
  6. Sprinkle the tops of each mold with coarse sea salt.
  7. Place in refrigerator or freezer until the chocolate hardens.
  8. Serve and enjoy!

For something so small- these cups sure were savory- and a big hit with the family and friends I shared them with!

I love experimenting with Fall flavors- like pumpkin, cinnamon and caramel- so expect a lot more posts like this as the season progresses and I continue to get creative in the kitchen!

But until then, I’ve got to focus on a rather large stack of paperwork on my desk and a full inbox waiting to be tackled before this morning is done.

Enjoy the rest of your day, y’all!

xx

– Ashley –

Easter Eats: Cookies-and-Cream Shortbread Cookies

Good Morning and Happy Monday, everyone! I hope you all had a wonderful weekend!

In my family, both immediate and extended- making the time to have occasional big, family dinners with lots of food and conversation is really important. The older everyone gets, and the more responsibilities and other commitments/engagements that come up- the harder it is to get everyone together.

We all know and understand that- which is why we treasure holidays like Thanksgiving, Christmas, Easter (and sometimes the 4th of July or Memorial Day during the Summer!) It’s when everyone can be together and eat, drink and be merry.

My mother hosts Easter at her home every year- and while she typically enjoys taking charge and putting together the menu- she never says no to any dishes anyone wants to bring with them to share. When I bring food, I typically gravitate towards appetizers (they’re so much fun!) and side dishes- but I’m also known to whip up some pretty good desserts, too.

This year, in lieu of my usual “safe desserts” like thumbprint cookies or my experimental cakes and pies- I thought I’d bring this fun spin on shortbread cookies, instead- which is a chocolate lover’s dream!

WHAT YOU’LL NEED:

FOR THE COOKIES:

  • 15 chocolate sandwich cookies
  • ½ cup (56g) confectioners’ sugar
  • 1 cup (226g) cubed unsalted butter, at room temperature
  • 2 cups (241g) all-purpose flour
  • ½ teaspoon fine sea salt
  • 1 teaspoon pure vanilla extract

FOR THE GLAZE:

  • 1 cup (113g) confectioners’ sugar
  • 2 tablespoons heavy cream

READY? HERE’S WHAT YOU DO:

  1. MAKE THE COOKIES: Preheat the oven to 300°F and line two baking sheets with parchment paper.
  2. In the bowl of a food processor, pulse the cookies until they form fine crumbs, about 1 minute. Remove 2 tablespoons of the cookie crumbs and reserve in a small bowl.
  3. Add the confectioners’ sugar to the food processor and pulse to combine. Add the butter and process until the mixture is light and fluffy, about 1 minute. Scrape the bowl of the food processor well.
  4. Add the flour and salt, and pulse until the dough comes together, about 30 seconds. Add the vanilla and process until combined.
  5. Divide the dough in half and then form each piece into an inch-thick disk. On a lightly floured surface, roll out the dough to ⅓ inch thick. Cut the dough into circles using a round fluted cookie cutter and then transfer to the prepared baking sheets.
  6. Bake until the cookies start to brown at the edges, 15 to 17 minutes. Cool completely.
  7. MAKE THE GLAZE: In a medium bowl, whisk the confectioners’ sugar and cream until a thick glaze forms. Working one at a time, spoon 1 teaspoon of glaze on top of each cookie. Let the glaze set for 5 minutes, then sprinkle the reserved cookie crumbs on top of each cookie. The glaze will fully set in another 10 to 15 minutes and then the cookies are ready to serve.

I had opted to sprinkle crumbled up sandwich cookie chunks on top of the still-setting glaze as opposed to the finely pulsed cookie crumbs I’d initially used to create the dough- since I thought it gave these a more fun look- but you can do it by the book if desired!

The result is a sweet, decadent dessert that serves as the perfect finale to a great meal! I can’t wait for my mother to see (and eat) these when I bring the next batch to her house.

And with that being said- there are lots of big changes happening at my job this week, which I’ll discuss at a later time when I have a free moment- and I’m here bright and early to get the jump on them and stay on top of things!

I’m off- but here’s wishing you all an easy start to your day and your work week!

xx

– Ashley –