Fall Foodie: Sweet Potato Crostini

Good Morning and Happy Wednesday, everyone!

The work-week is halfway over, and before I jump into what few tasks I set aside for my half day at the office this morning and prepare to head on over to The Big E a little later on today- I wanted to share the first of what I’m sure will be many Fall-inspired recipes I recently cooked up (and will no doubt be revisiting again soon since we are pretty much officially in my favorite season right now!)

Sweet potatoes are probably my favorite vegetable because you can do many different things with them in the kitchen and they always taste delicious. Cut into fries? Added into stews? Turned into a traditional but delightful dessert? They’re fantastic- and very much something I love to cook/bake with this time of year.

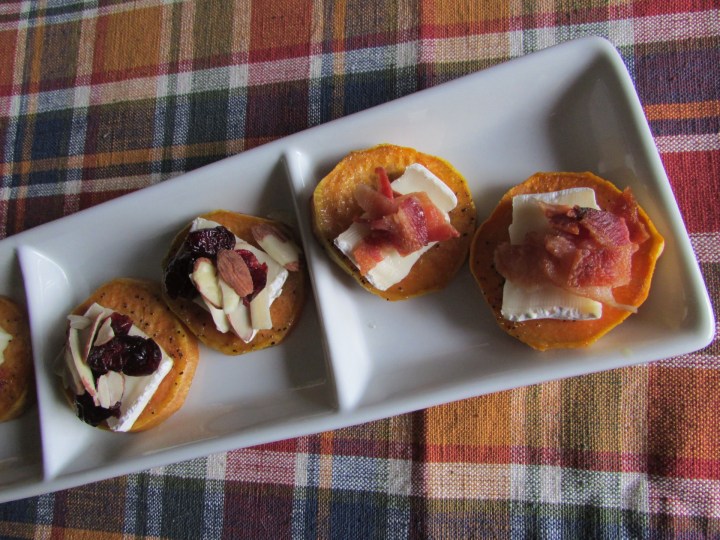
These crostini, which are essentially a crispier and slightly smaller-sized take on a loaded baked potato- are the perfect pre-dinner or Game Day snack because you can top them with pretty much anything and they’re guaranteed to be a crowd favorite. For this particular batch- I opted for seasonal flavors that I thought would compliment the potato’s sweetness- but feel free to get experimental!

WHAT YOU’LL NEED:

  • 2 small sweet potatoes
  • 2 tablespoons extra-virgin olive oil
  • Salt and freshly ground black pepper
  • Sliced/cubed brie cheese (one piece to top each potato slice.)
  • ½ cup of cooked and crumbled bacon pieces
  • ½ cup of chopped and salted roasted almonds
  • ½ cup of chopped dried cranberries

READY? HERE’S WHAT YOU DO: 

  1. Preheat the oven to 400°F. Line a baking sheet with parchment paper.
  2. Cut the ends off the sweet potatoes and then cut the potatoes into ¼-inch-thick slices. Brush both sides of the potato slices with olive oil and season with salt and pepper.
  3. Arrange the potato slices on the prepared baking sheet and roast until they are golden brown and crisp, 17 to 20 minutes. Let cool completely.
  4. Top each cooled potato slice with a piece of brie and sprinkles of the toasted almonds, dried cranberries and bacon crumble. You can mix and match here- it’s totally fine!
  5. Serve and enjoy!

I honestly ate so many of these things in one sitting and I’m not ashamed to admit it. They’re so good!

I also read a recipe that topped the potato slices with cream cheese and smoked salmon- which sounded like it might be life-changing- so I may have to incorporate that into the next batch I make, as well!

But before I make another couple dozen of these and before I head off to enjoy my afternoon off- I’ve got some work to do over the next few hours.

As always, I’ll be back on Friday morning- as is tradition!

Enjoy your “Hump Day,” y’all!

xx

– Ashley –

Seaside Starters: Maryland Crab Cakes

Good Morning and Happy Thursday, everyone!

This coming weekend is shaping up to be a busy (in a good way!) one- including a long overdue dinner with my family to celebrate my older brother and my niece’s upcoming birthdays, working at the station, catching a screening of “It: Chapter 2” with friends- and then Sunday will be fully devoted to sand, surf and scallops at Hampton Beach’s Annual Seafood Festival!

And, of course- the Patriots’ regular season kicks off- so there will be beer and nachos, as well. As is tradition!

Inspired by the Seafood Festival, and still getting acquainted with my new kitchen- I thought I’d whip up one of my own favorite recipes to share with you all- crab cakes! These can be served as an appetizer or, if you’re eating more than one- as an entrée all on their own. Whatever you choose- they’re delicious and very easy to make!

WHAT YOU’LL NEED:

  • 8 ounces crab meat- drained, shells removed and patted dry.
  • ¼ cup diced red bell pepper
  • 2 teaspoons tarragon
  • 1 cup Panko bread crumbs, divided in half
  • 1 egg
  • ¼ teaspoon McCormick Old Bay seasoning
  • ½ teaspoon salt
  • ¼ teaspoon pepper
  • 2 tablespoons mayonnaise
  • ¼ teaspoon dried mustard
  • 1 teaspoon prepared horseradish (optional)
  • Olive oil (to fry cakes)

READY? HERE’S WHAT YOU DO:

  1. Drain crab meat, pick out shells and pat dry with paper towels
  2. Add crab meat, bell pepper, tarragon, ½ cup Panko bread crumbs, egg, salt, pepper, mayo, dried mustard and Old Bay seasoning to a medium mixing bowl and mix with a rubber-tipped spatula.
  3. Scoop handfuls of the combined mixture out one at a time and gentle pat/press together to form cakes.
  4. Add ½ cup Panko bread crumbs to a shallow dish. Place each cake in and coat the sides until all of the cakes are covered evenly in bread crumbs.
  5. Heat a heavy sauté pan and add the olive oil to cover the bottom of the pan. Place cakes in the sauté pan and cook approximately 4 minutes on each side or until they are evenly browned
  6. Remove cakes and place on a plate to allow to cool for approximately 5 minutes.
  7. Drizzle horseradish sauce over the cakes and serve.

I could eat these crab cakes all day every day- that’s how much I love them- and while I’m sure I’ll be eating plenty of variations of these at the Seafood Festival, among many, many other things- I’m a bit biased when it comes to my own! I don’t think they can be topped!

Next week, my blogging schedule returns to normal now that Labor Day is over (Monday, Wednesday and Friday!) I’ll be sure to have more Autumnal Activities to share, a peek into the Fall section of my wardrobe- and a few other surprises!

But until then- enjoy your weekend, everybody!

xx

– Ashley –

Summer Sweets: Peaches-and-Cream Ice Pops

Good Morning and Happy Friday, everyone!

I’ve got another long weekend ahead of me since I took this coming Monday off from work as a bit of a “personal day.” Originally, I had plans in the Cape with some friends- but it ended up not happening due to scheduling conflicts for a few of us so now I’m simply taking the day to rest, recharge- and maybe hit the beach or Ashfield Lake again.

And while temperatures are soaring here in New England- I thought today would be as good a time as any to share a really delicious, super easy-to-make-and-freeze Popsicle treat for yourself and/or your guests to beat the heat with!

If you like real fruit, Greek yogurt and refreshing desserts- then you are going to *love* this recipe!

WHAT YOU’LL NEED:

  • 1 pound (453g) peaches, peeled and cut into wedges
  • ⅓ cup (66g) light brown sugar
  • ½ teaspoon ground cinnamon
  • Pinch of fine sea salt
  • 1½ cups (340g) plain Greek yogurt
  • ½ cup (112g) crème fraîche
  • 2 teaspoons pure vanilla extract
  • ¼ teaspoon pure almond extract

READY? HERE’S WHAT YOU DO:

  1. Preheat the oven to 375°F. Arrange the peaches in an even layer on a baking sheet. Add the brown sugar, cinnamon and salt; toss to combine.
  2. Roast the peaches until tender, 20 to 25 minutes. Cool for 15 minutes.
  3. In a large bowl, whisk the yogurt, crème fraîche, vanilla and almond extract to combine. Transfer about three quarters of the mixture to a container with a pour spout.
  4. Add the cooled peaches to the remaining yogurt mixture in the bowl. Use a potato masher to mash the two together (it’s okay if there are chunks of peaches left)
  5. Pour 2 tablespoons of the yogurt mixture into each ice-pop mold. Follow with 4 tablespoons of the peach mixture, then 4 tablespoons of the yogurt mixture. Continue alternating the two until the molds are full. It’s okay if the layers swirl together.
  6. Place an ice-pop stick in the center of each mold and transfer to the freezer. Freeze until solid, at least 2 hours.
  7. Run the molds under warm water and then unmold the ice pops. Keep frozen until ready to serve.

Honestly, the hardest part of this recipe was the waiting for the ice pops to freeze so I could finally enjoy one in front of my air conditioner! And, once I did- I was so relieved these tasted just as good as they looked.

I love a good ice pop this time of year- and I’m thinking I may try to incorporate pineapple or mango instead of peaches the next time I attempt this one. Something with a little more citrus and sour behind it. We’ll see how it goes!

I’m off to get some work done before I take off for the next few days- but here’s wishing you all a wonderful weekend ahead. I’ll be back- bright and early- on Monday morning. ‘Til then- have fun, wear sunscreen and stay hydrated out there!

xx

– Ashley –

Brunch Bites: Mini Quiches with Hash Brown Crusts

Good Morning and Happy Monday, everyone!

While I don’t leave for vacation until Wednesday morning- I’m pretty much already there mentally at this point. Although I have a longtime fear of flying- I’ve reached such a point of emotional and physical exhaustion that I know I’m going to sleep like a baby the second the plane takes off and will hopefully wake up feeling refreshed and ready to soak up the sunshine when I land in Vegas!

I digress. My perpetual feeling of sleepiness is the result of being a bit overworked and overwhelmed with my move right now (as well as all the rain we’ve been getting!) and thankfully has nothing to do with poor diet- as made evident by this positively exquisite dish I prepared for brunch over this past weekend.

With just a few ingredients and under an hour of your time- you can make these little and totally customizable quiches, too!

WHAT YOU’LL NEED:

FOR THE CRUST

  • 3 cups frozen hash browns, thawed and drained well
  • 3 tablespoons butter, melted
  • Pinch of salt

FOR THE FILLING

  • 6 bacon strips, cooked and crumbled into bits
  • 1 cup cherry tomatoes, quartered
  • 7 eggs
  • ½ cup whole milk
  • Salt and freshly ground black pepper
  • 1 cup white cheddar cheese, grated

READY? HERE’S WHAT YOU DO:

  1. MAKE THE CRUST: Preheat the oven to 425°. Lightly grease a standard-size muffin tin. In a medium bowl, toss the hash browns with the butter and salt until well combined.
  2. Place 2 tablespoons hash browns into each cup of the muffin tin. Press gently into the base to form a crust. It’s OK if the potatoes come up slightly around the edge of the cup.
  3. Bake the hash-brown crust until it’s golden and crisp, about 12 to 15 minutes. Remove from the oven and cool slightly. Reduce the oven temperature to 375°.
  4. MAKE THE FILLING: Place about 1 tablespoon bacon into each crust, then top with a few pieces of tomato.
  5. In a medium bowl, whisk the eggs with the milk and season with salt and pepper. Pour the custard into each cup, stopping about ¼ inch below the top rim. Sprinkle cheese on top and bake until the quiches are puffed up and golden, 12 to 15 minutes. Cool for 5 minutes before removing from the tin. Serve warm.

Honestly, I could probably eat an entire dozen of these on my own in one sitting- because they were delicious and one or two didn’t feel like nearly enough for me by the time I was finished. Between the hash brown crust and the fluffy egg loaded with bacon and tomato- I was on Cloud Nine during my entire brunch get-together.

I know I’ll be whipping these up again after I’m moved into the new apartment and I finally have a chance to go grocery shopping!

I’m off to do some last minute crunching at my office to get things done before I take off to the West Coast- but I’ll be back on Wednesday morning with a pre-flight recap of my weekend!

Enjoy your Monday, everyone! Here’s hoping it’s easy and stress-free for all of you!

xx

– Ashley –

Easter Eats: Cookies-and-Cream Shortbread Cookies

Good Morning and Happy Monday, everyone! I hope you all had a wonderful weekend!

In my family, both immediate and extended- making the time to have occasional big, family dinners with lots of food and conversation is really important. The older everyone gets, and the more responsibilities and other commitments/engagements that come up- the harder it is to get everyone together.

We all know and understand that- which is why we treasure holidays like Thanksgiving, Christmas, Easter (and sometimes the 4th of July or Memorial Day during the Summer!) It’s when everyone can be together and eat, drink and be merry.

My mother hosts Easter at her home every year- and while she typically enjoys taking charge and putting together the menu- she never says no to any dishes anyone wants to bring with them to share. When I bring food, I typically gravitate towards appetizers (they’re so much fun!) and side dishes- but I’m also known to whip up some pretty good desserts, too.

This year, in lieu of my usual “safe desserts” like thumbprint cookies or my experimental cakes and pies- I thought I’d bring this fun spin on shortbread cookies, instead- which is a chocolate lover’s dream!

WHAT YOU’LL NEED:

FOR THE COOKIES:

  • 15 chocolate sandwich cookies
  • ½ cup (56g) confectioners’ sugar
  • 1 cup (226g) cubed unsalted butter, at room temperature
  • 2 cups (241g) all-purpose flour
  • ½ teaspoon fine sea salt
  • 1 teaspoon pure vanilla extract

FOR THE GLAZE:

  • 1 cup (113g) confectioners’ sugar
  • 2 tablespoons heavy cream

READY? HERE’S WHAT YOU DO:

  1. MAKE THE COOKIES: Preheat the oven to 300°F and line two baking sheets with parchment paper.
  2. In the bowl of a food processor, pulse the cookies until they form fine crumbs, about 1 minute. Remove 2 tablespoons of the cookie crumbs and reserve in a small bowl.
  3. Add the confectioners’ sugar to the food processor and pulse to combine. Add the butter and process until the mixture is light and fluffy, about 1 minute. Scrape the bowl of the food processor well.
  4. Add the flour and salt, and pulse until the dough comes together, about 30 seconds. Add the vanilla and process until combined.
  5. Divide the dough in half and then form each piece into an inch-thick disk. On a lightly floured surface, roll out the dough to ⅓ inch thick. Cut the dough into circles using a round fluted cookie cutter and then transfer to the prepared baking sheets.
  6. Bake until the cookies start to brown at the edges, 15 to 17 minutes. Cool completely.
  7. MAKE THE GLAZE: In a medium bowl, whisk the confectioners’ sugar and cream until a thick glaze forms. Working one at a time, spoon 1 teaspoon of glaze on top of each cookie. Let the glaze set for 5 minutes, then sprinkle the reserved cookie crumbs on top of each cookie. The glaze will fully set in another 10 to 15 minutes and then the cookies are ready to serve.

I had opted to sprinkle crumbled up sandwich cookie chunks on top of the still-setting glaze as opposed to the finely pulsed cookie crumbs I’d initially used to create the dough- since I thought it gave these a more fun look- but you can do it by the book if desired!

The result is a sweet, decadent dessert that serves as the perfect finale to a great meal! I can’t wait for my mother to see (and eat) these when I bring the next batch to her house.

And with that being said- there are lots of big changes happening at my job this week, which I’ll discuss at a later time when I have a free moment- and I’m here bright and early to get the jump on them and stay on top of things!

I’m off- but here’s wishing you all an easy start to your day and your work week!

xx

– Ashley –